
Introduction
If you live in Iceland, chances are you lease your home router from your internet service provider (ISP). By purchasing a hAP series router from us, you can pay for it in under a year, and you’ll get a much better router that you own and control. Installing the router is plug-and-play for the most part. Unfortunately, the ISPs in Iceland don’t want to make it too easy for you, as that would mean a loss of revenue for them. Here is a step-by-step guide on what you need to do, depending on your ISP.
Síminn
Síminn has a configuration in their system so that only the router they gave you will work. They know this is anti-competitive, so as soon as you call them and tell them you bought a new router, they remove this configuration.
Unplug everything from the router Síminn gave you and plug it into your new MikroTik hAP series router, making sure you use the MikroTik power supply that comes with the router.
You might need to power-cycle the fiber converter box that is likely near your power table (where your breakers are). We have heard that this box freezes up when it sees a new device. Simply unplugging this device from power for a few seconds (15-20) seems to do the trick.
Vodafone/Sýn
We hear they are exactly the same as Síminn. If you know something different, please contact us and let us know
Nova
We hear they are exactly the same as Síminn. If you know something different, please contact us and let us know
Hringiðjan
We have no reports on how these operate. If you have experience with them, please contact us and let us know. We had one router returned because their ISP wouldn’t allow them to use their own; it’s possible this was the this ISP and you can’t bring your own router if your internet subscription is with them. Please contact them before purchasing to confirm. We would really appreciate it if you would contact us and let us know what they say, so we can update this blog.
Hringdu
These guys have the most complex setup, as they require a non-standard configuration. Fortunately, MikroTik provides a simple wizard to help. You need to be comfortable installing an app on your device to use the wizard.
We have received conflicting reports on whether you also need to contact them, so be on the safe side and give them a call. Also, confirm with them the PPPoE login details (they will know what this means even if you don’t). We have been told they have standardized on SSN@hringdu.is as your username and just your SSN as your password. Confirm that this is correct for your account.
We will start with the phone app and then demonstrate the computer app. The screenshots will be from Android and Windows, respectively, but that should not matter.
Before you do anything, you need to find the label with the login details. This is both on the users guide in the box and on the router itself. Here is a picture of a label on a users guide
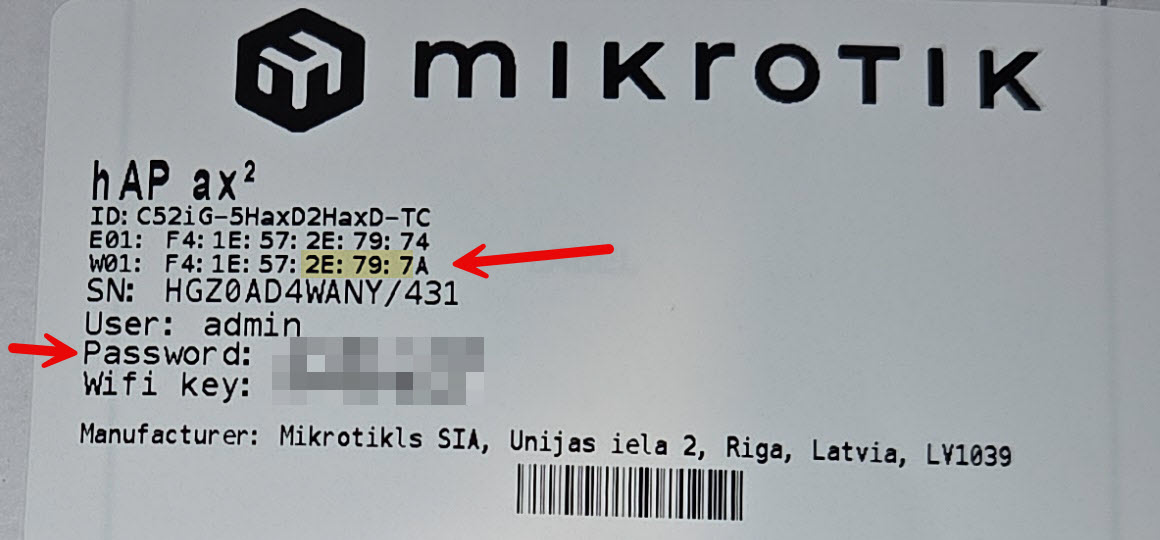
The WiFi key is what you use to log in to the WiFi. The SSID will be “MikroTik-xxxxxx”, where xxxxxx is the last 6 characters of the MAC address. Each interface has its own built-in address, called the MAC address, which is typically sequential. The sticker has the MAC for two of the interfaces. The sixth digit might differ from what is on the label. For example, the device in the picture has the default SSID “MikroTik-2E7979,” and you can see five of those digits highlighted on the label.
The App login is the User and Password line.
Android App (iPhone should look the same)
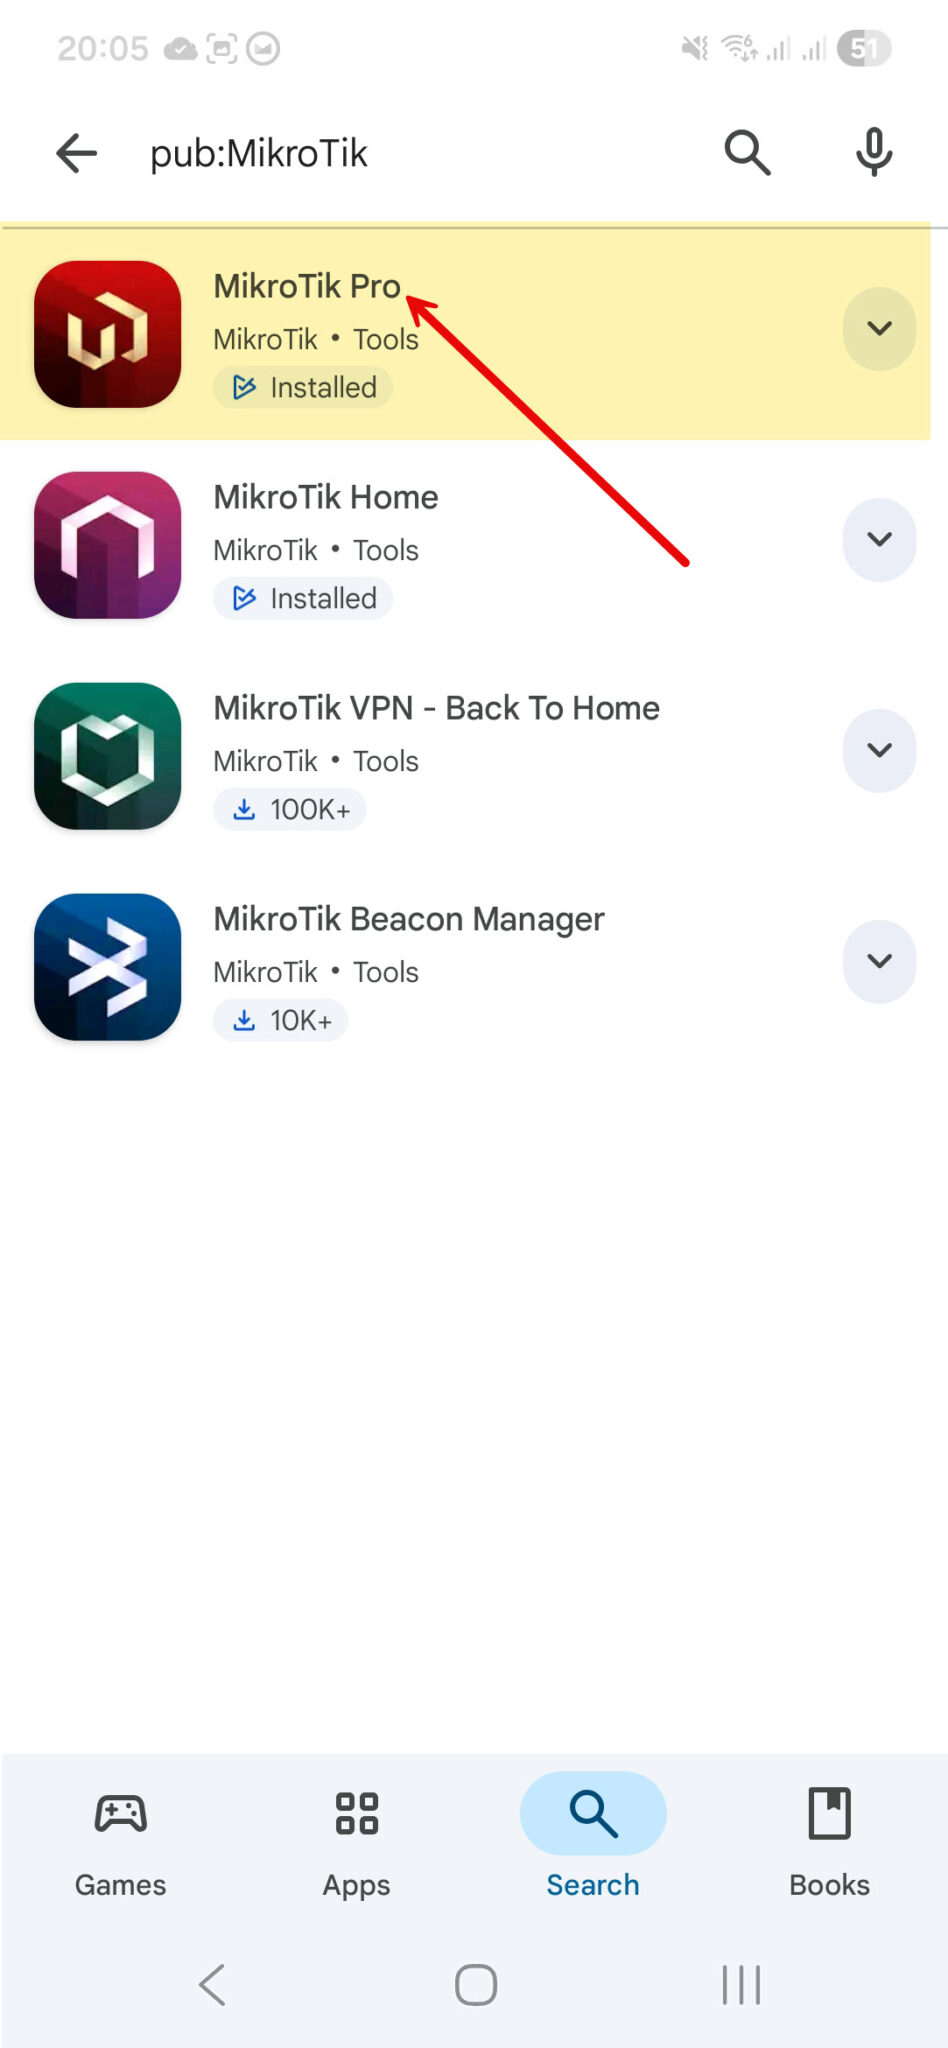
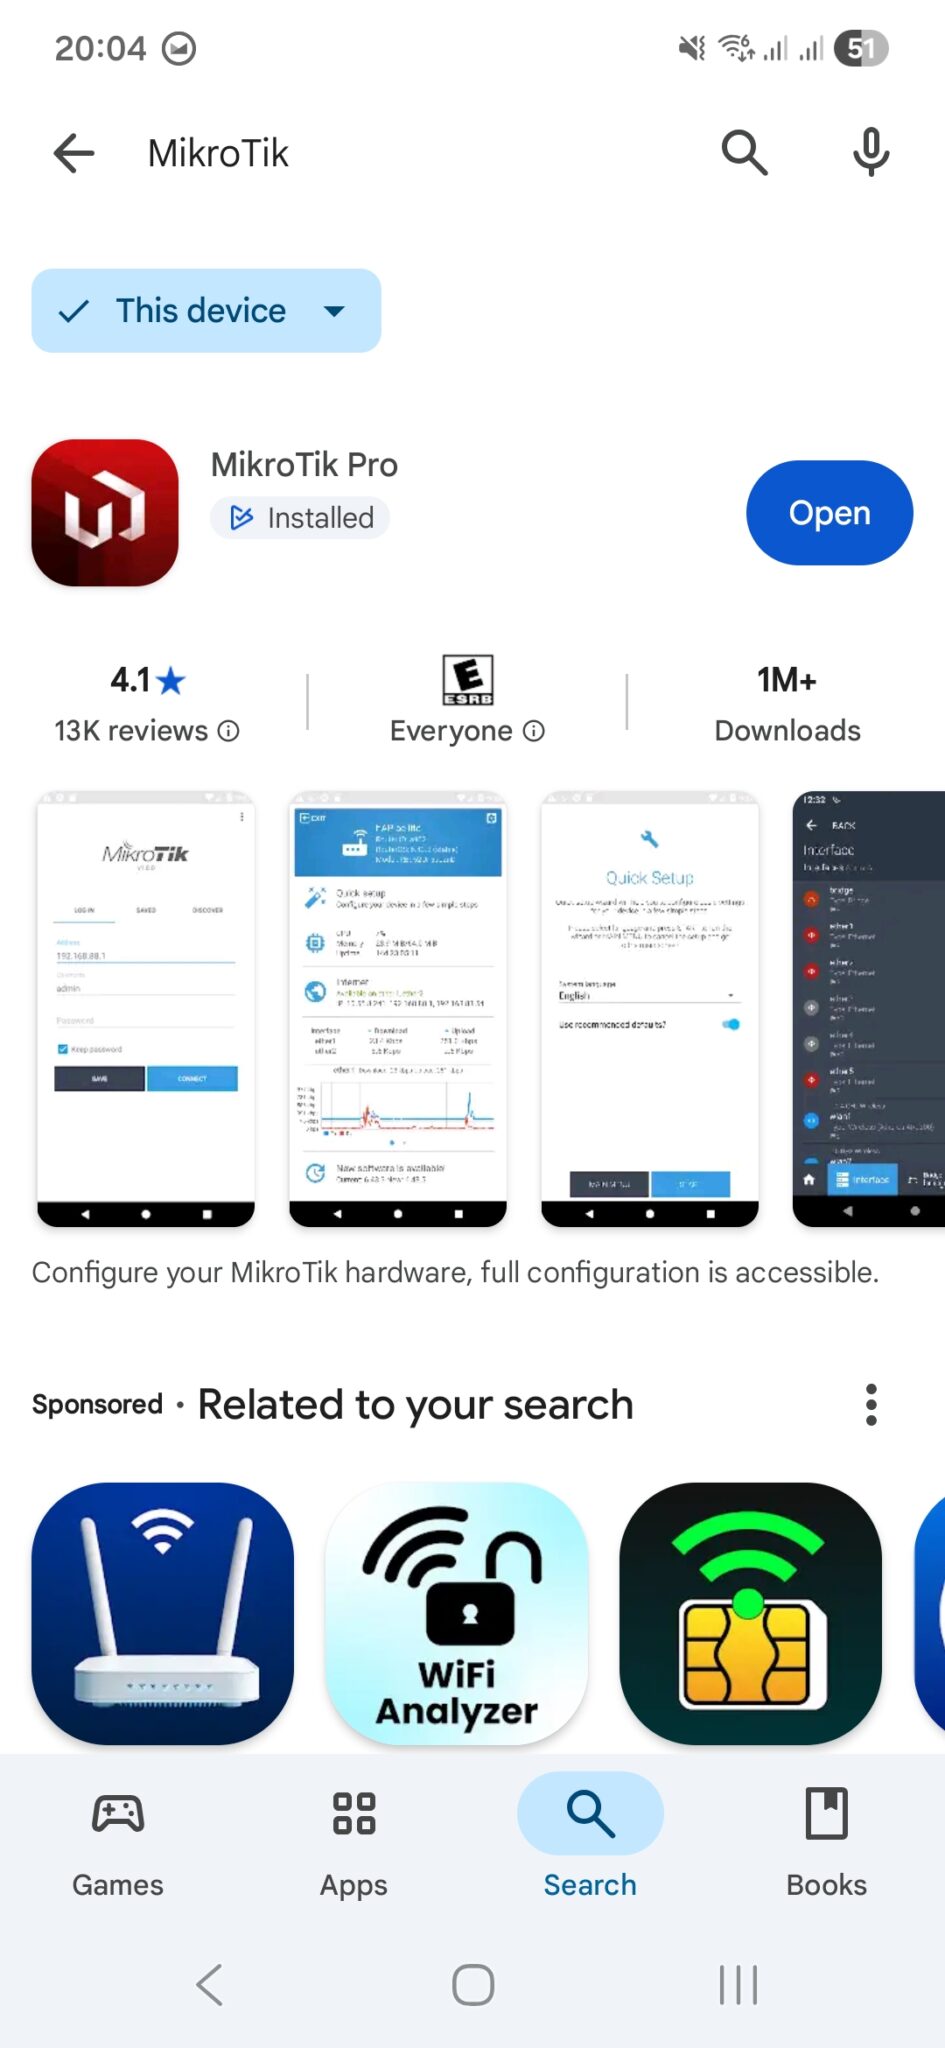
The first thing you need to do is go to the app store and find the “MikroTik Pro” app by MikroTik. Here is what it looks like in the Google Store; it should look very similar in the Apple Store.
Once the app is installed, open it and log in to your router.
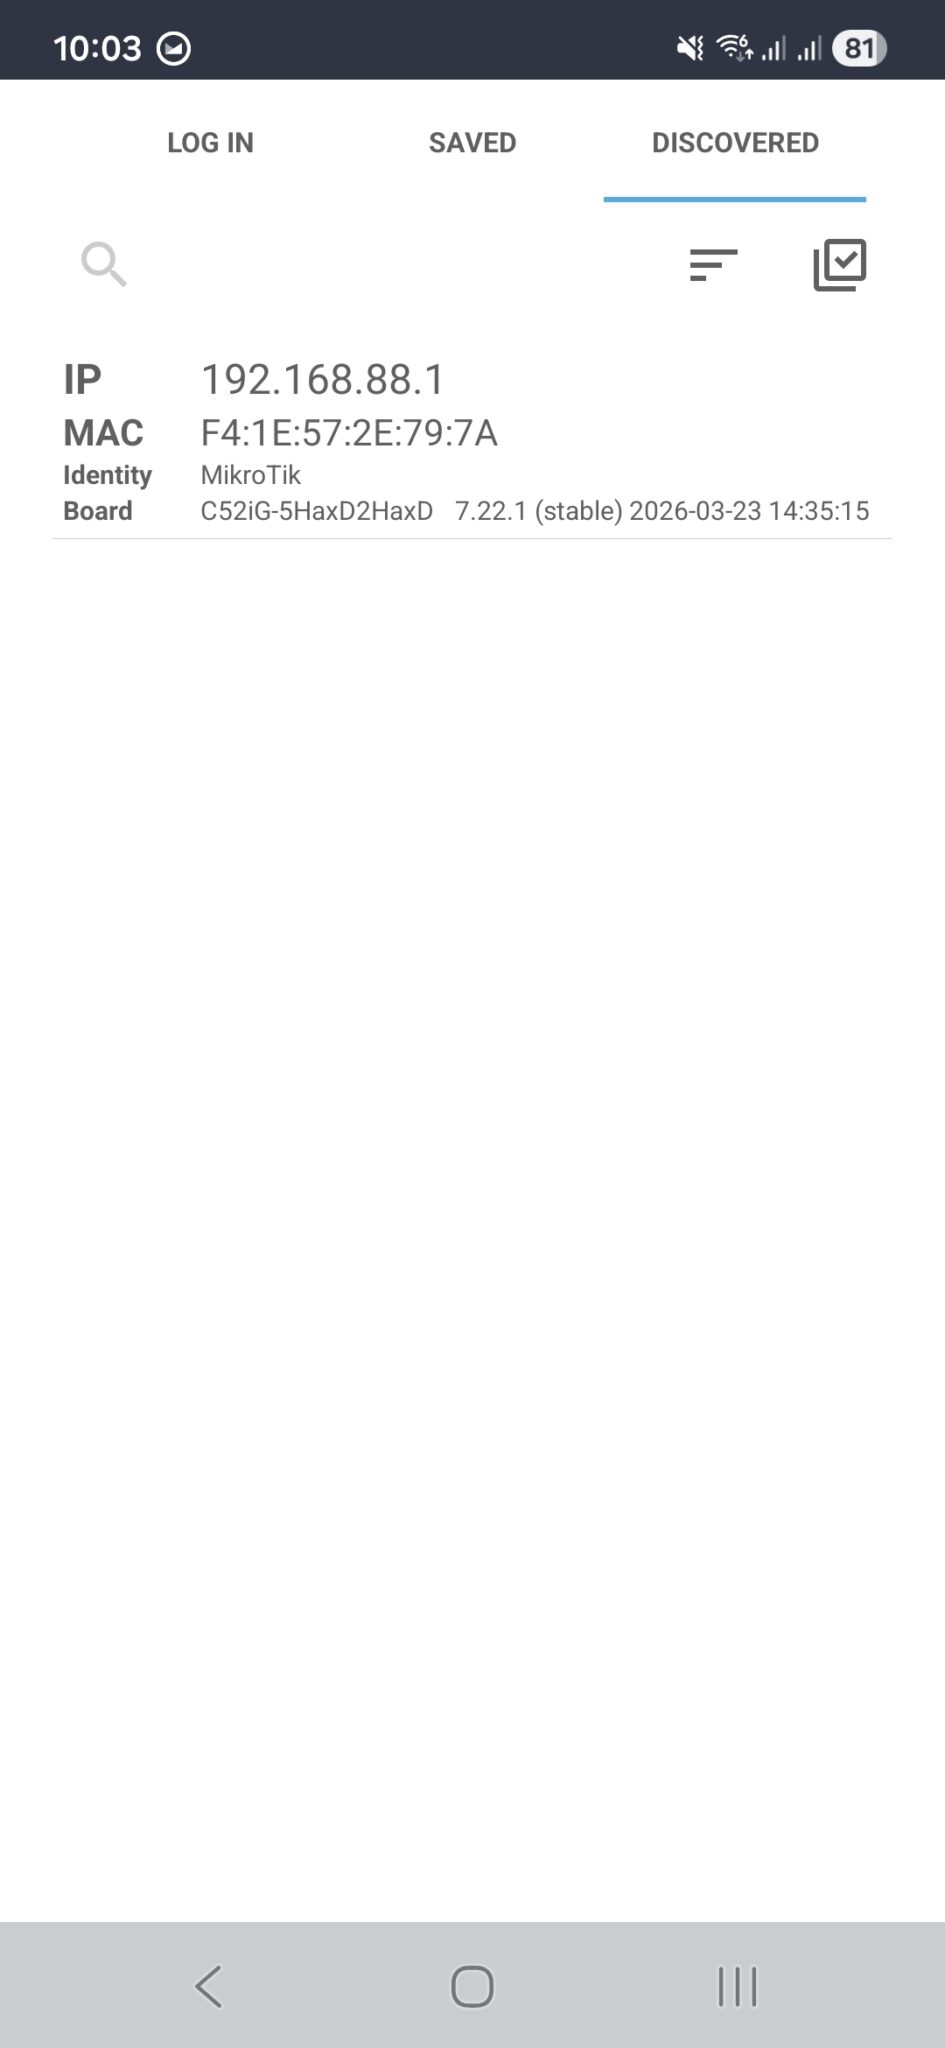
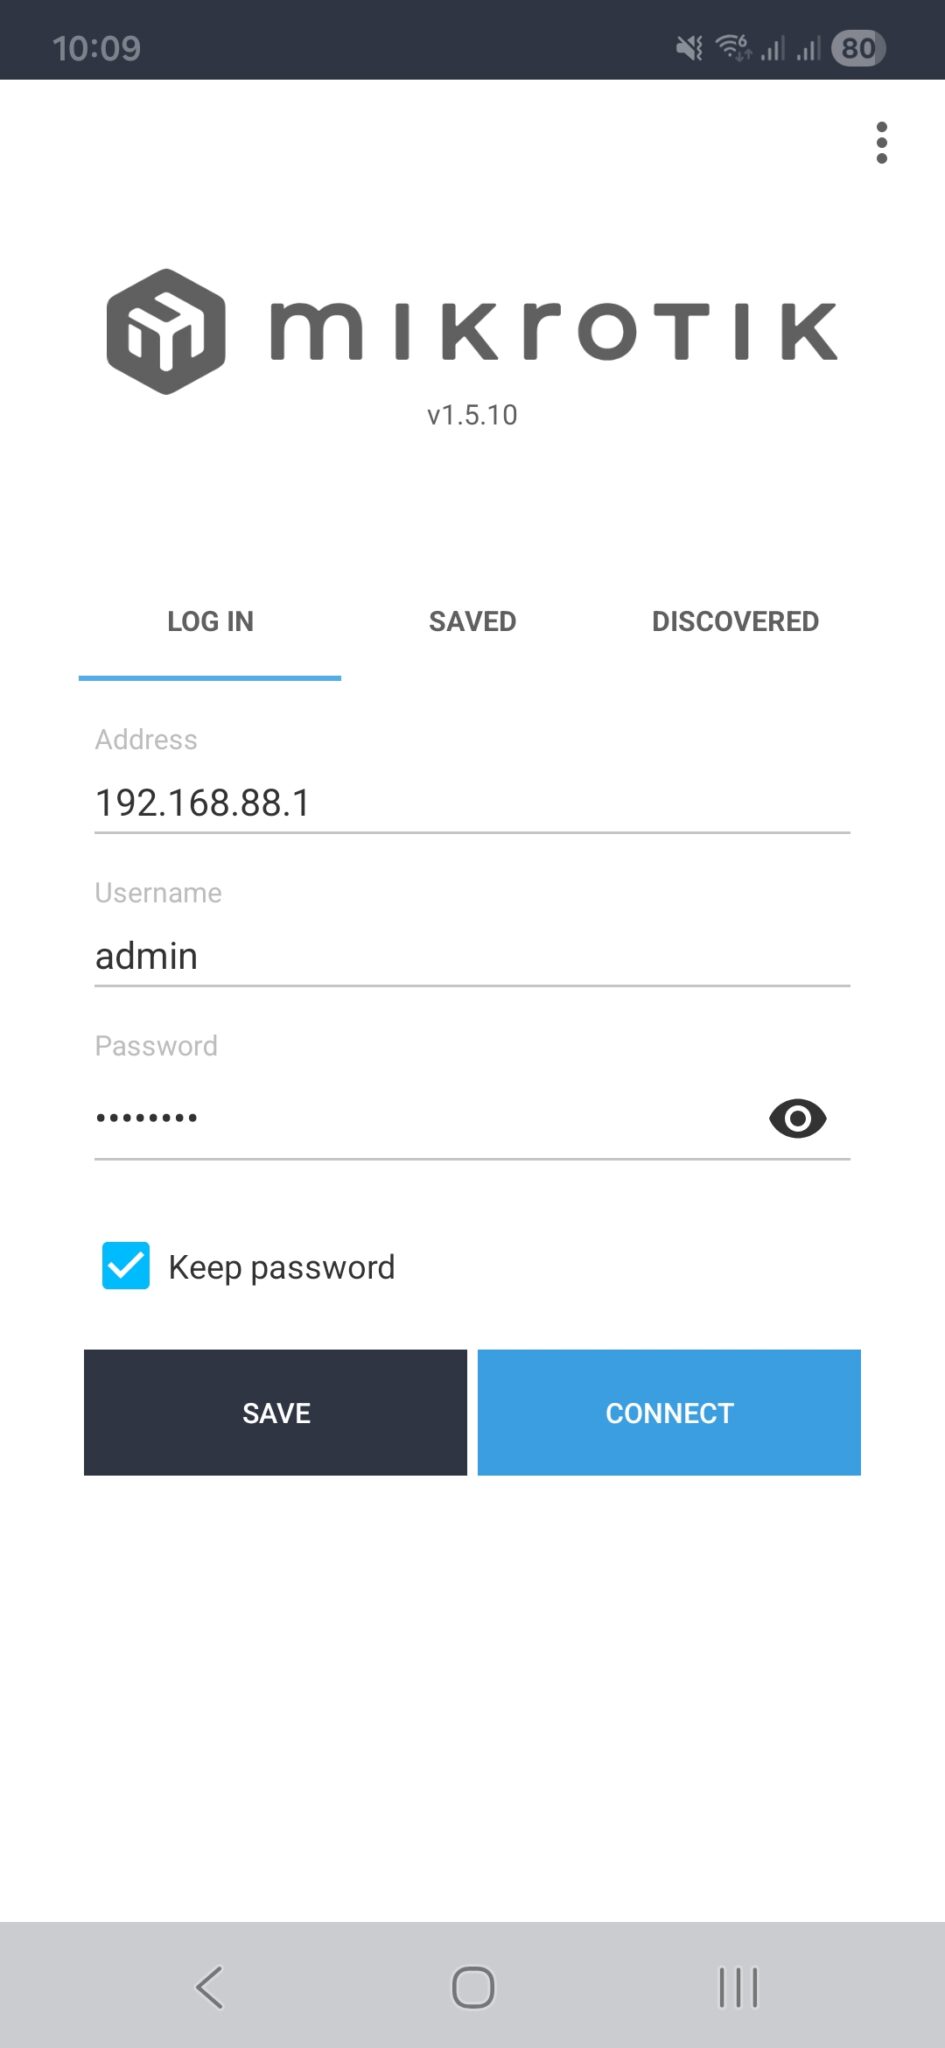
Before you can connect, it needs to be connected wirelessly. The app will open to the login tab, but if you switch to the discovered tab, you should see your router there. Clicking it will copy the details to the log in tab. Type in the login details from the label.
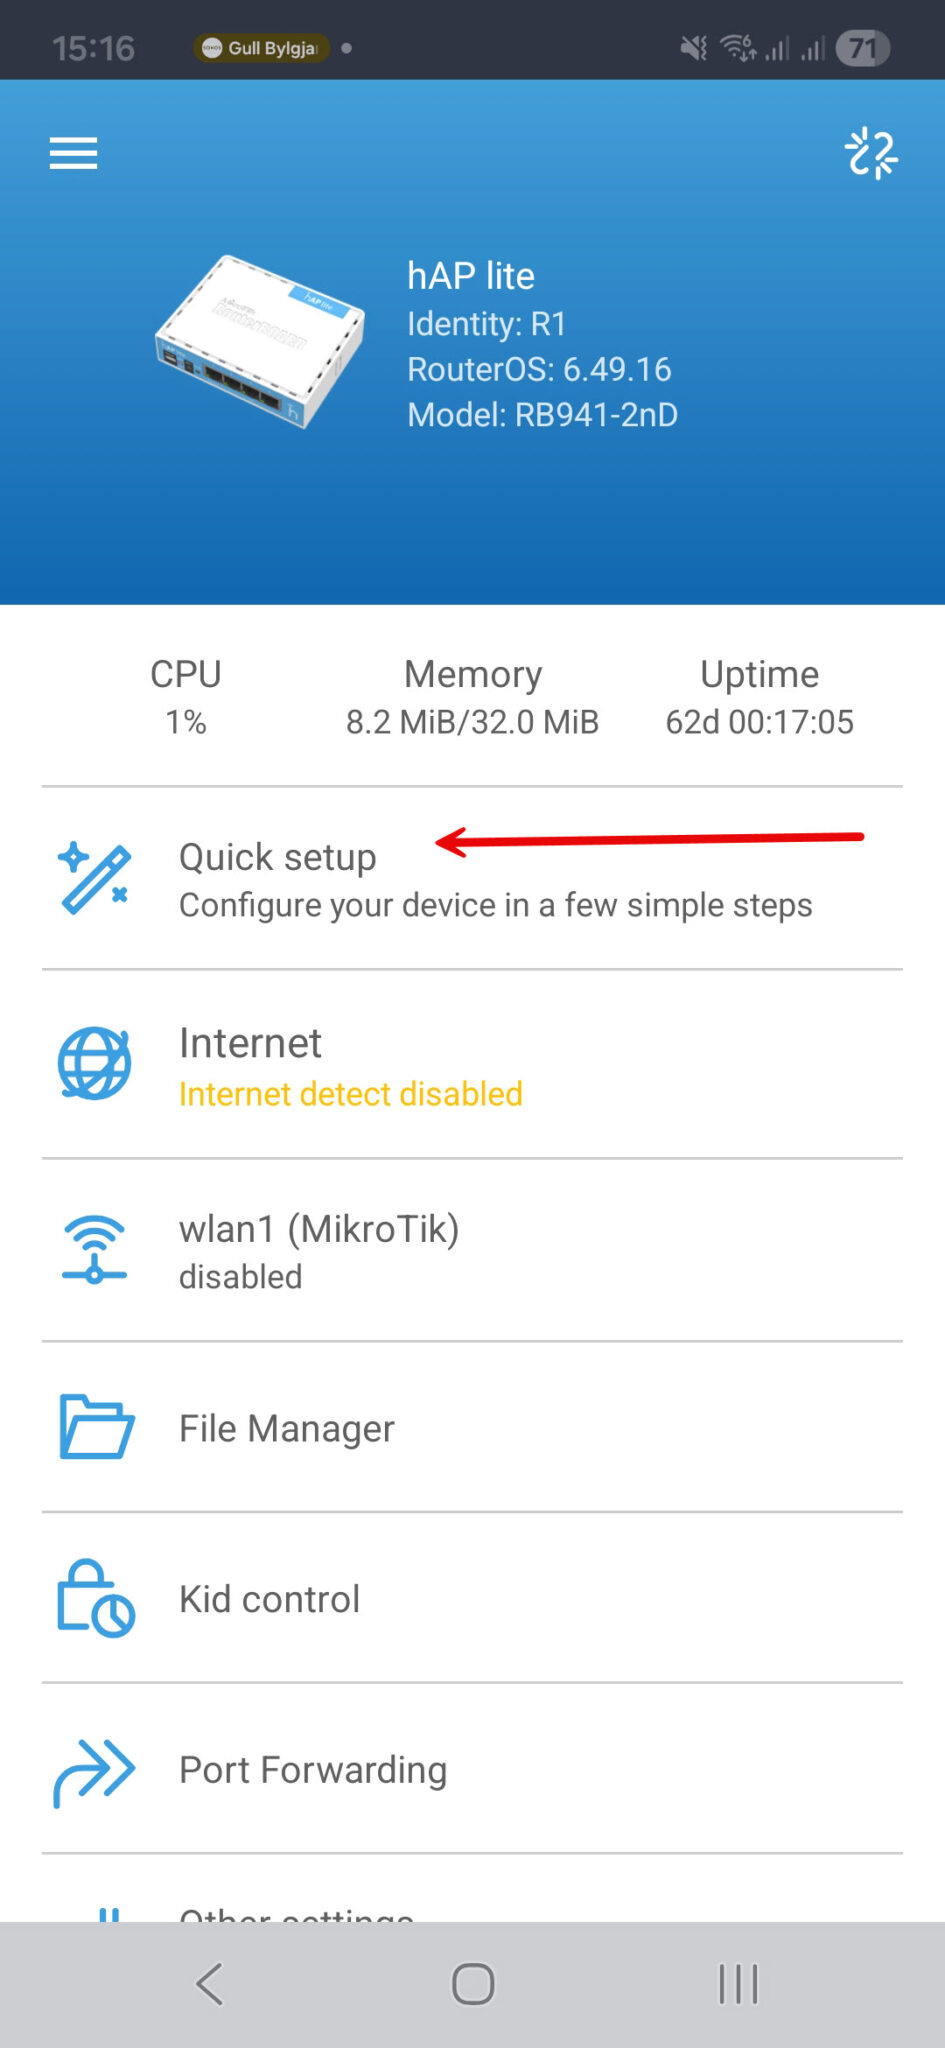
You should now be on the app’s home screen, which should look similar to this screenshot. Click the Quick setup
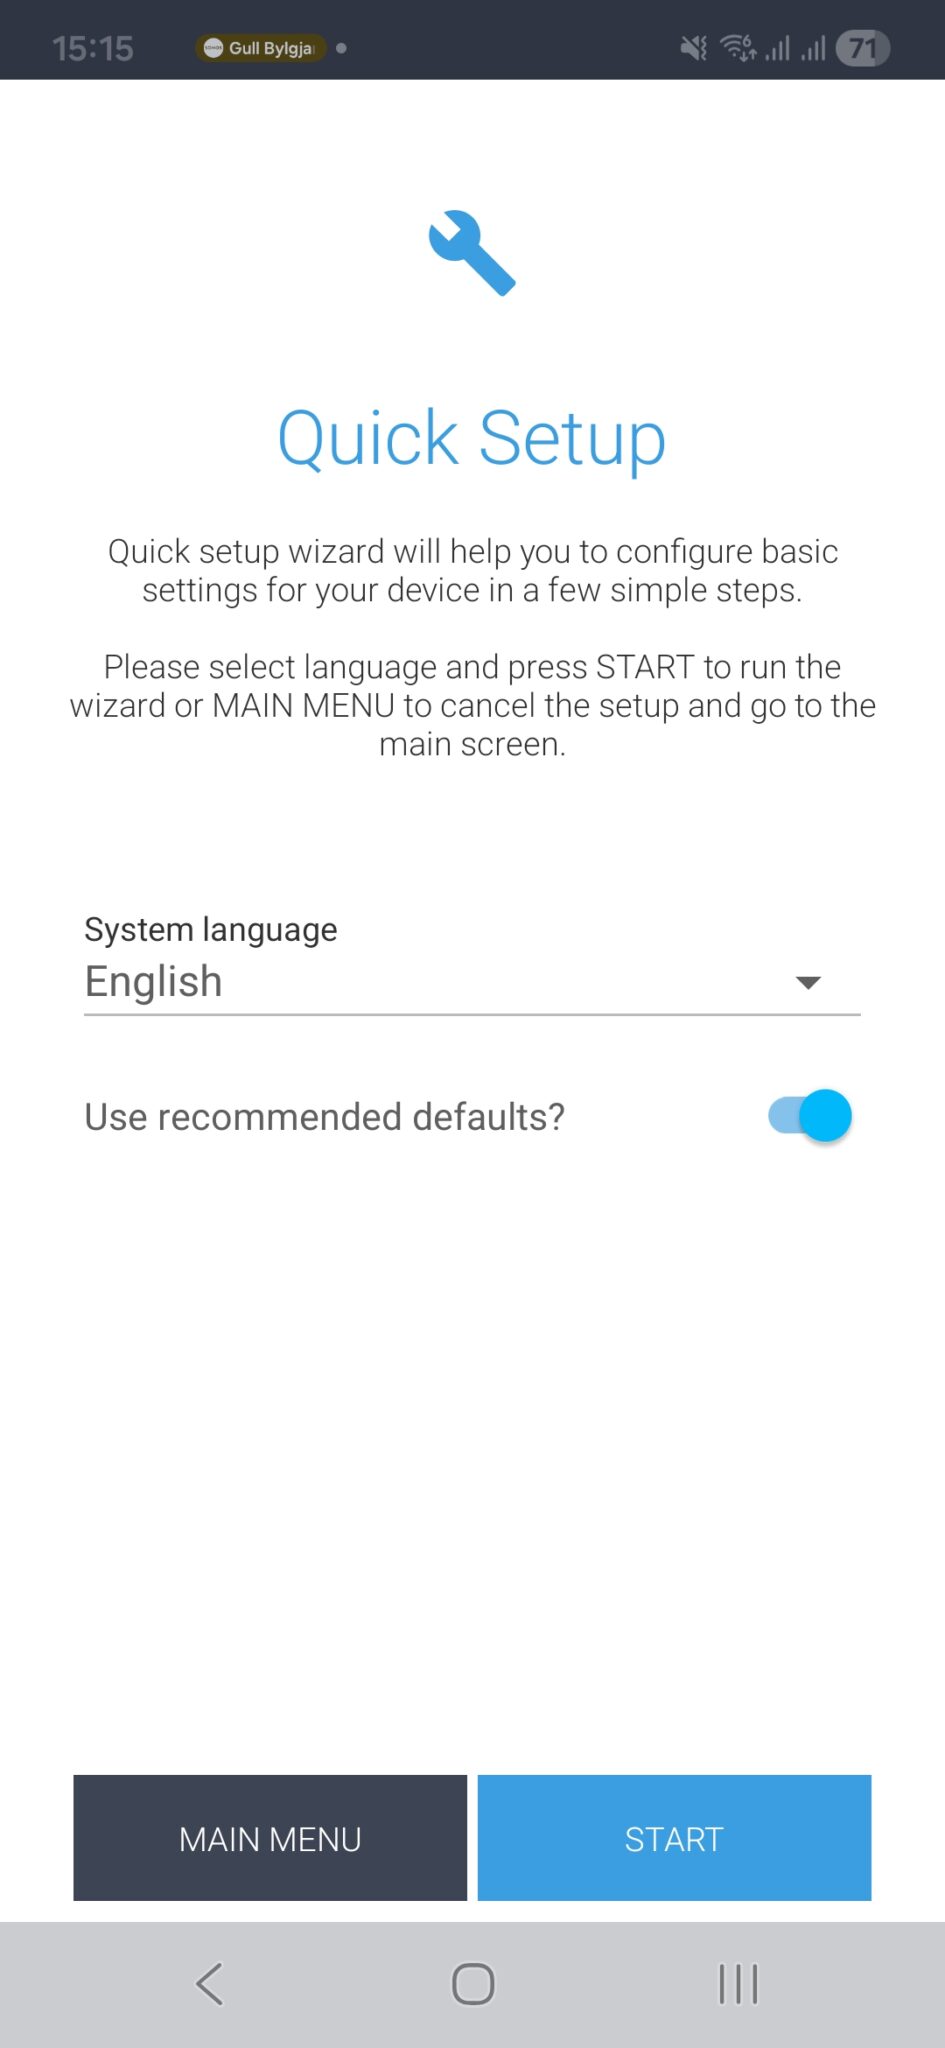
Click Start

Confirm the correct country was selected, then click next.
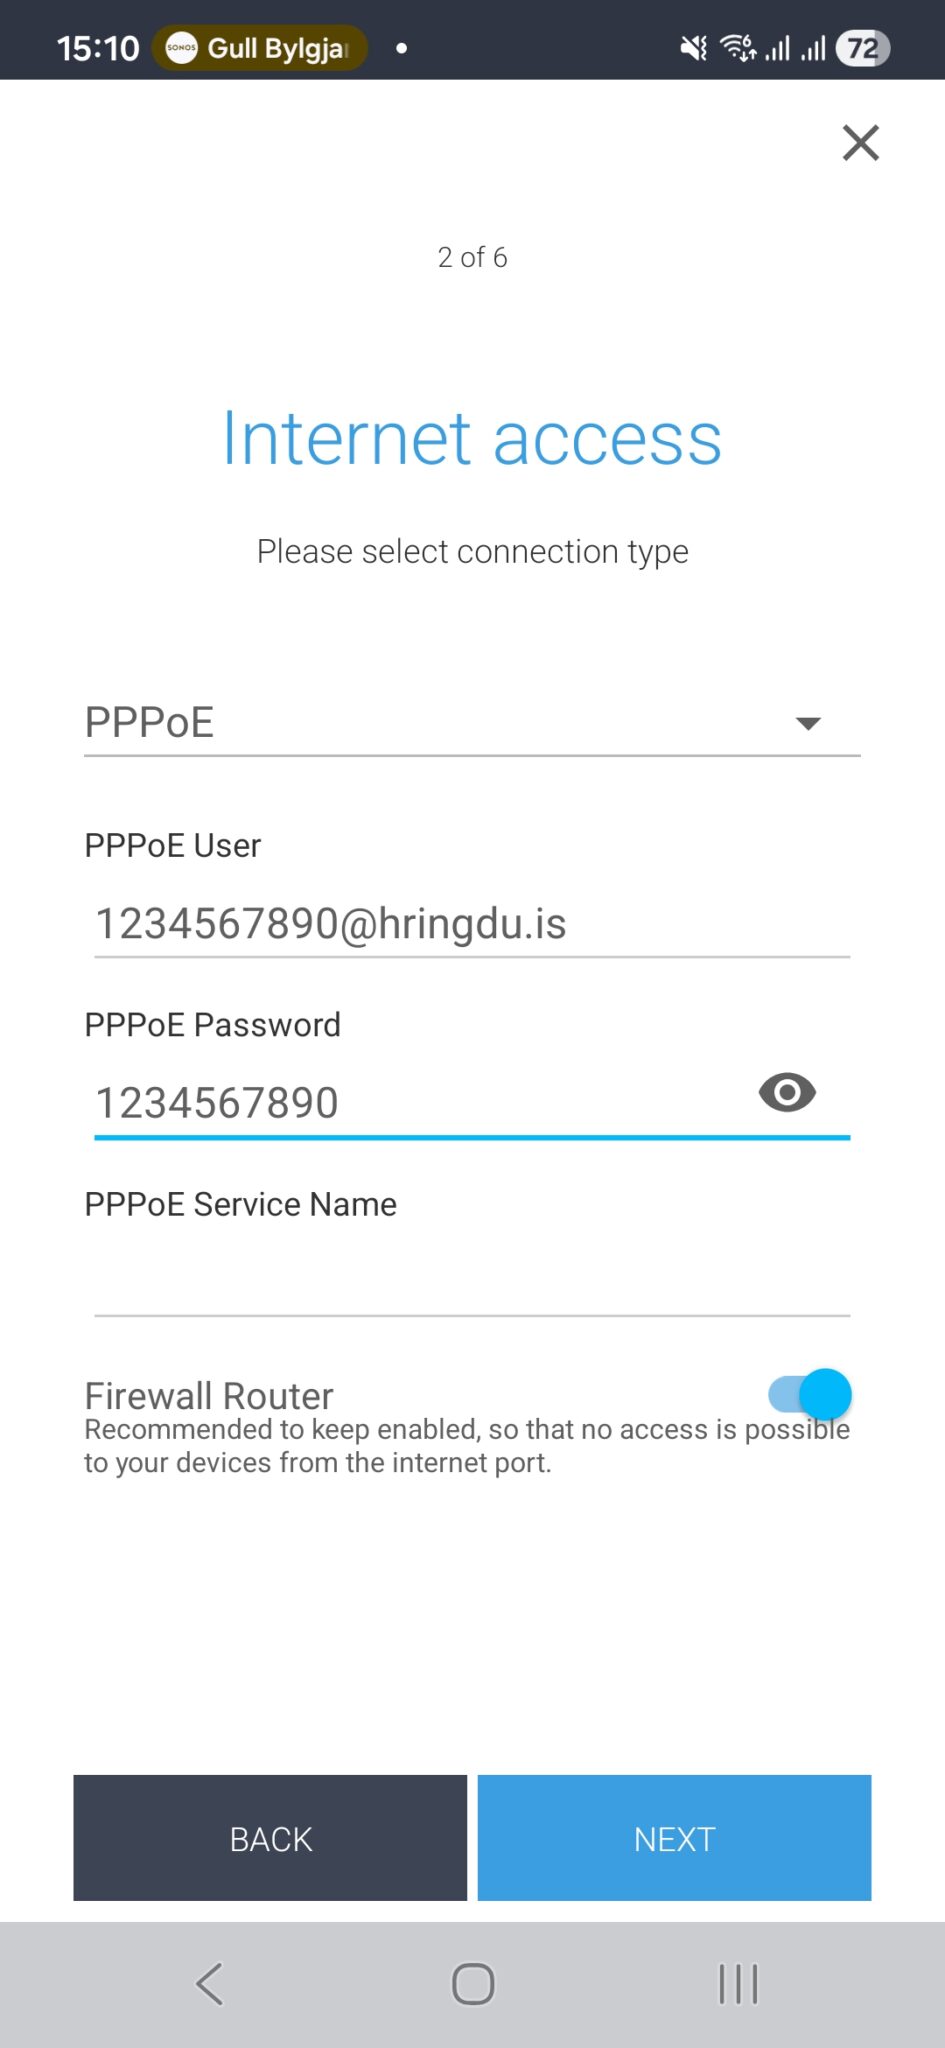
Here is the important step: make sure to select PPPoE from the drop-down at the top of the screen.
Then put in the PPPoE login info you confirmed with them; they did not require a PPPoE Service Name last time we heard.
Then click Next.
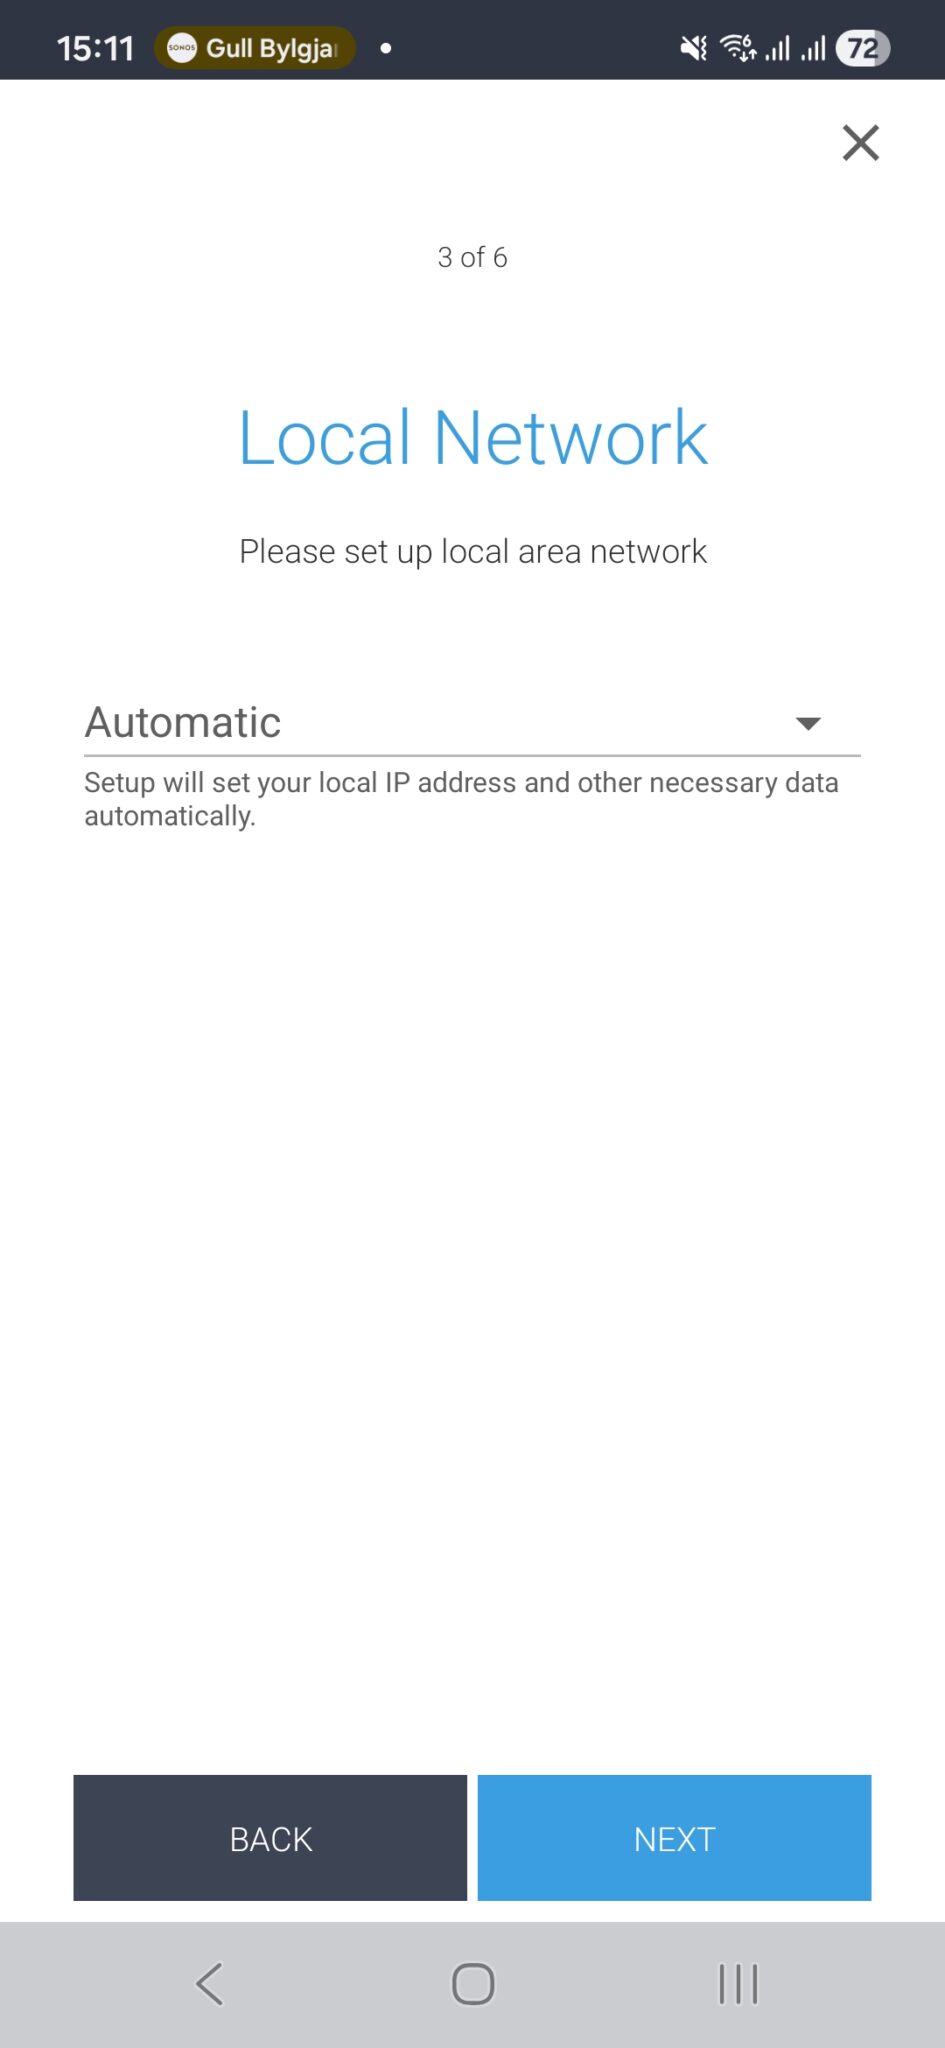
Just click Next here
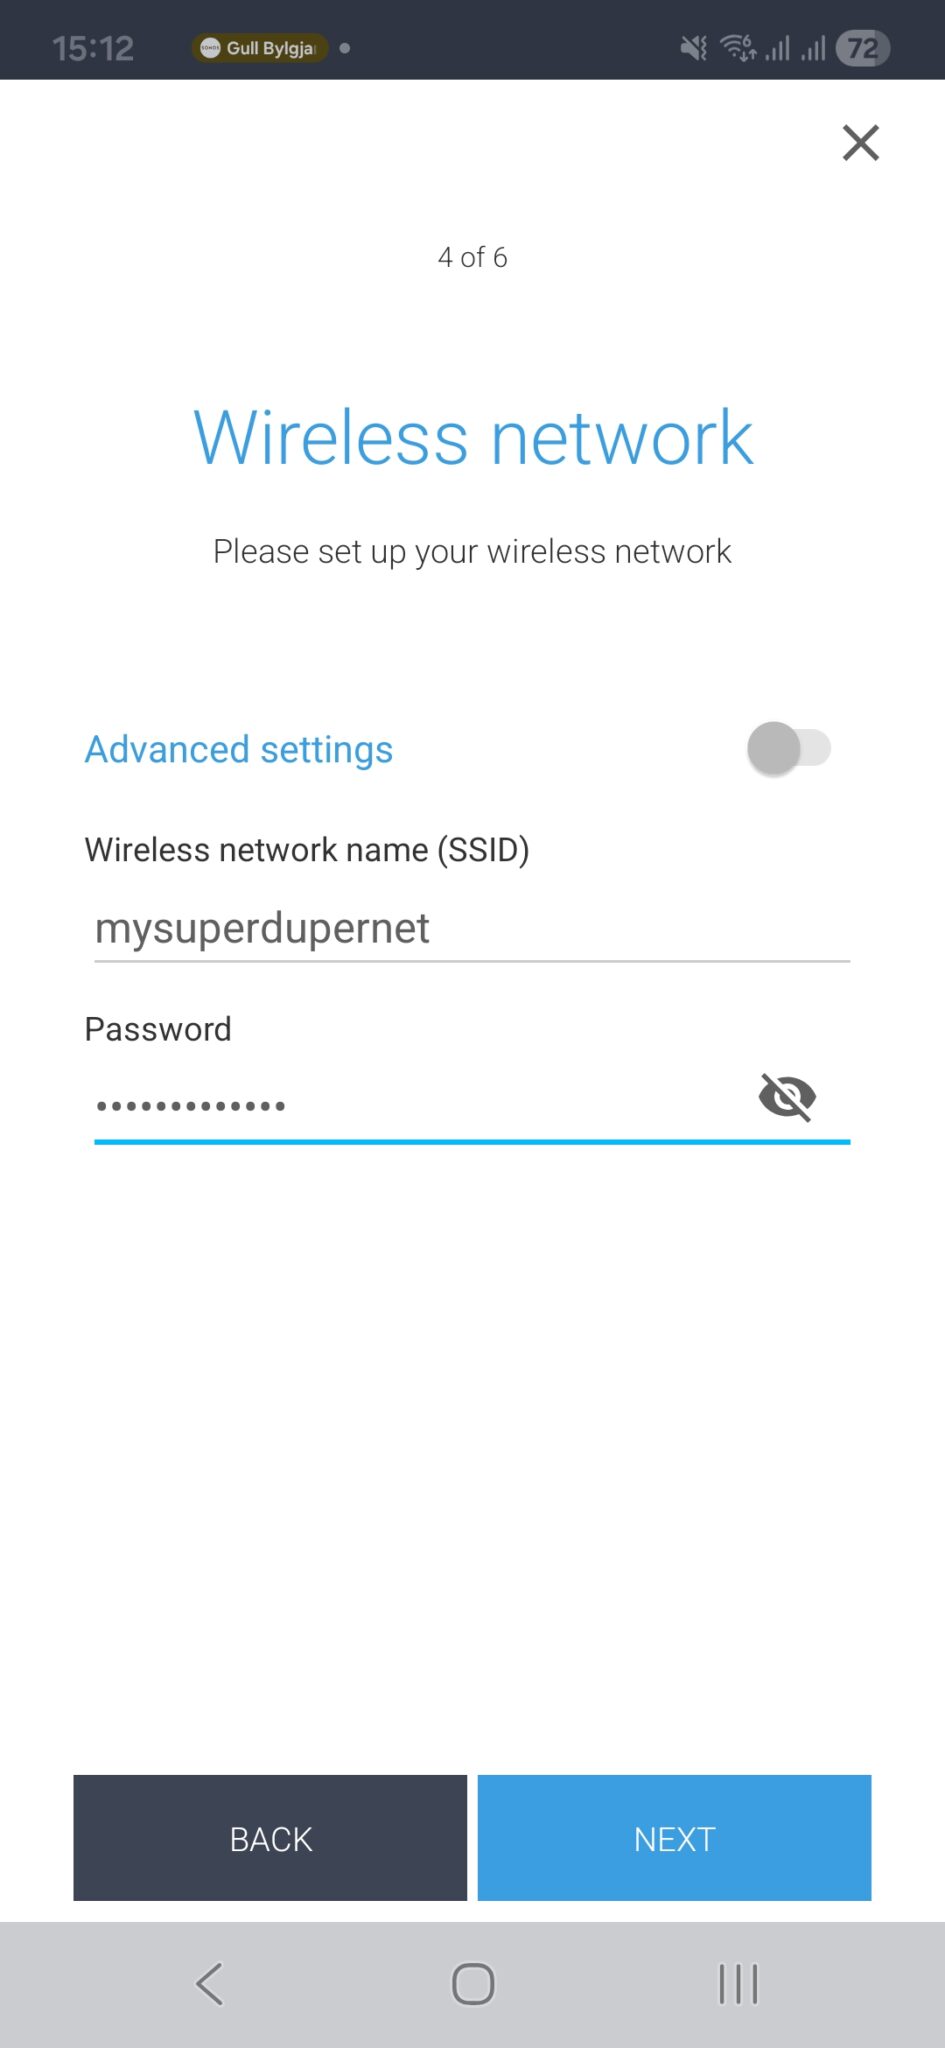
Here you can rename your network from MikroTik-2E7979 (or whatever) to whatever you want.
Absolutely any string will do here; we recommend keeping it rather short, though. (approx 3-10 chars).
Also specify a preferred password that is at least 8 characters. Then click next
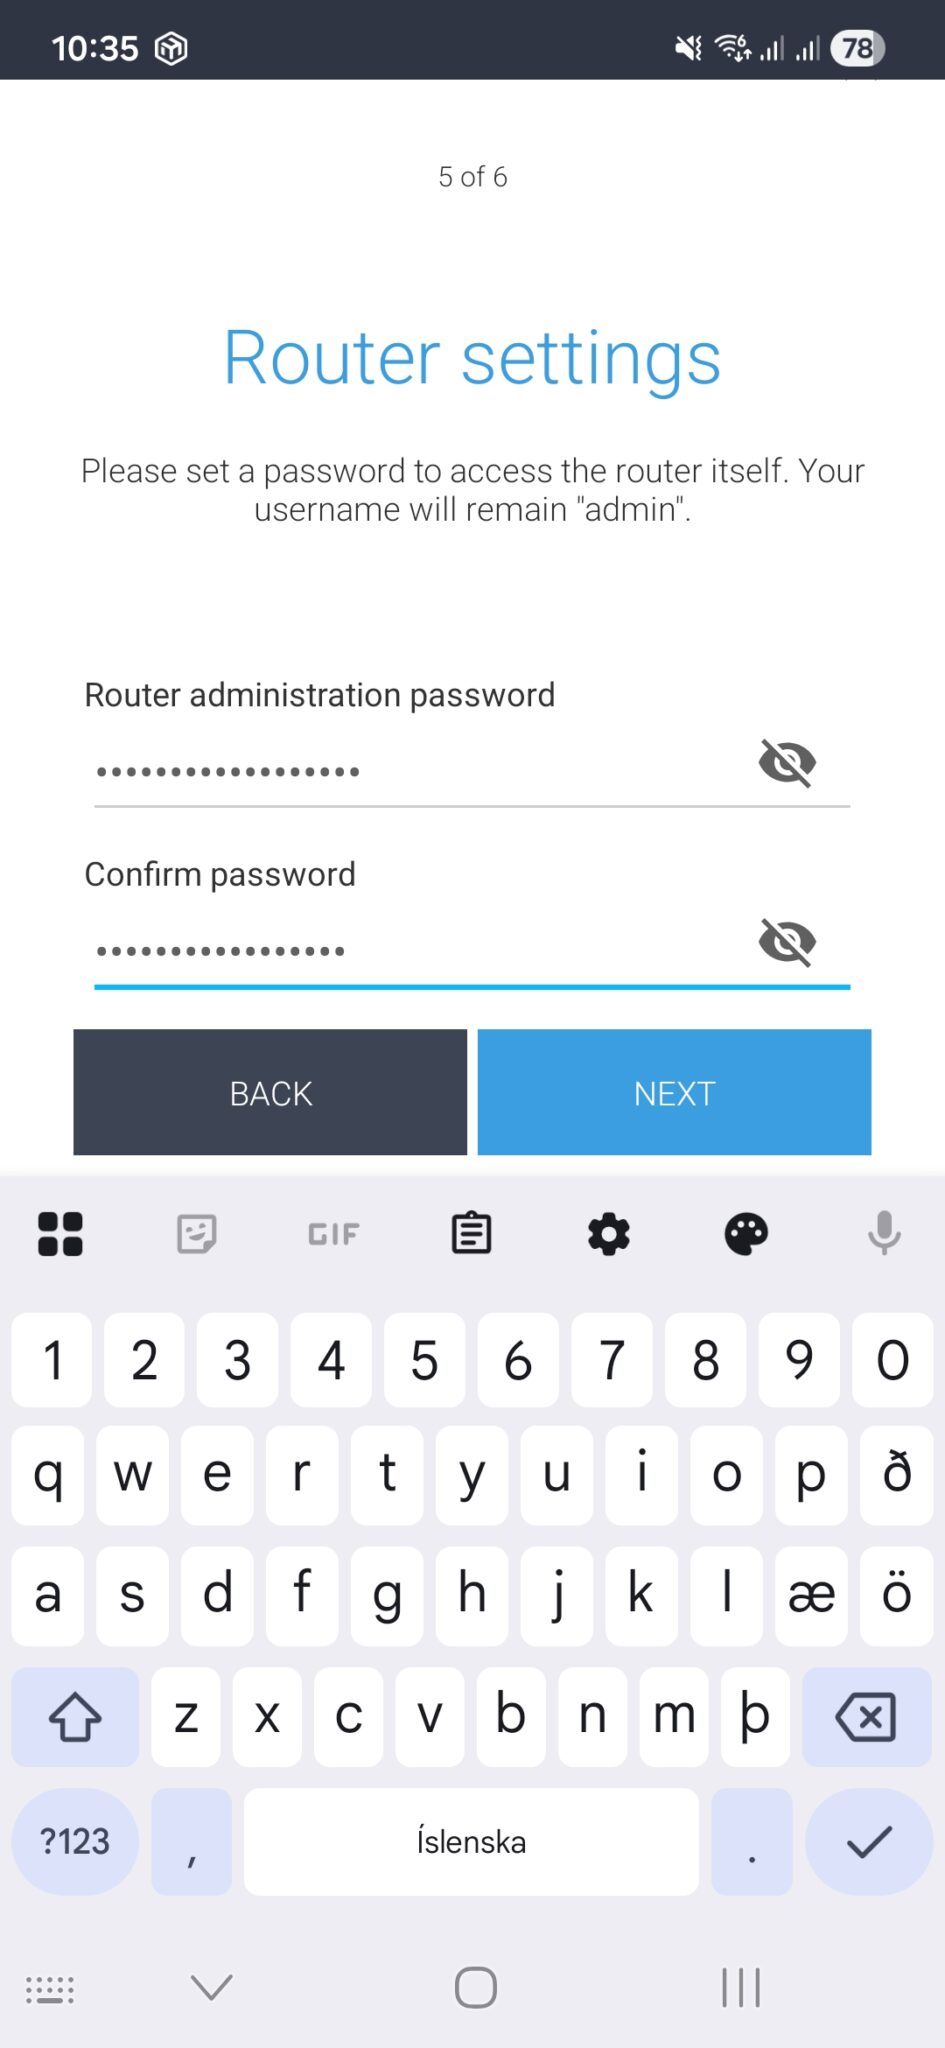
In this screen, you can change the device login password.
Anyone who knows the password can log in and change the settings. You can also just skip this step if you want.
Click Next when ready.
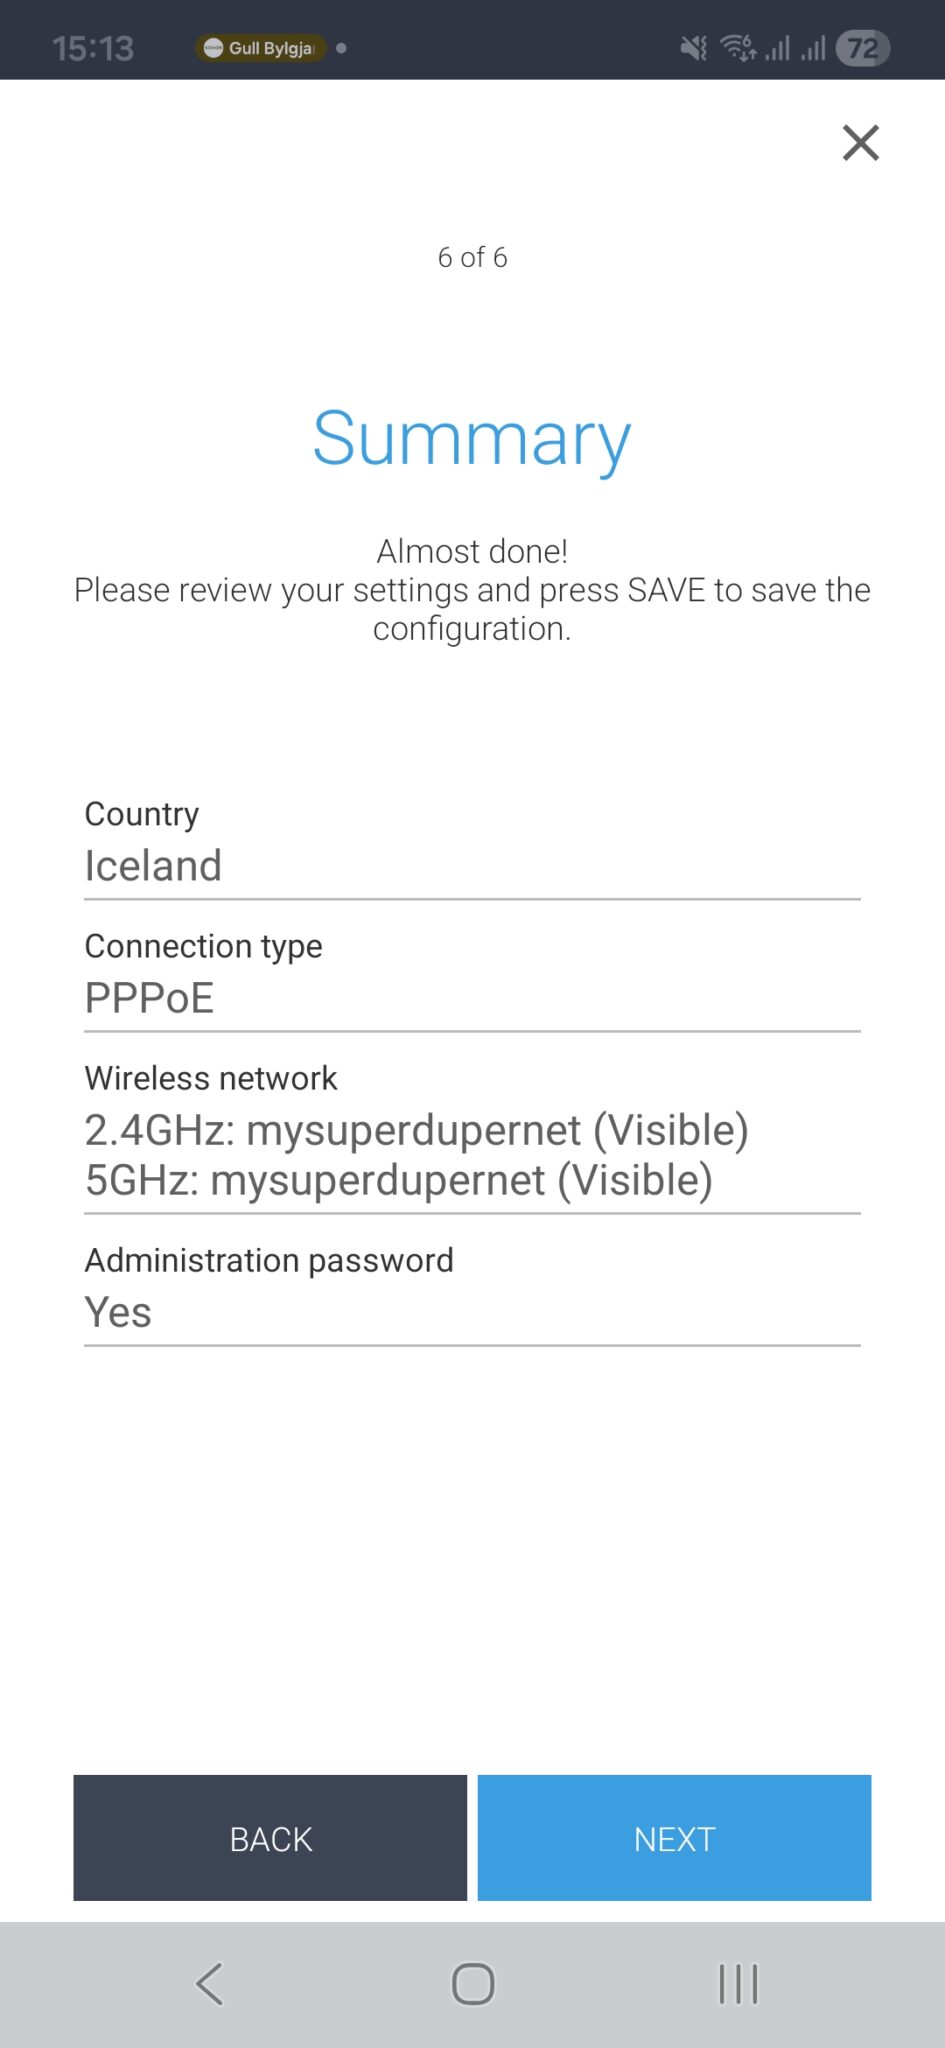
This is just a summary of what you changed. Review it and click next, and you’re done.
Unplug everything from the router Hrindgu gave you and plug it into your new MikroTik hAP series router, making sure you use the MikroTik power supply that comes with the router.
Windows (macOS should look the same)
The process for your computer is the same, just looks a little different.
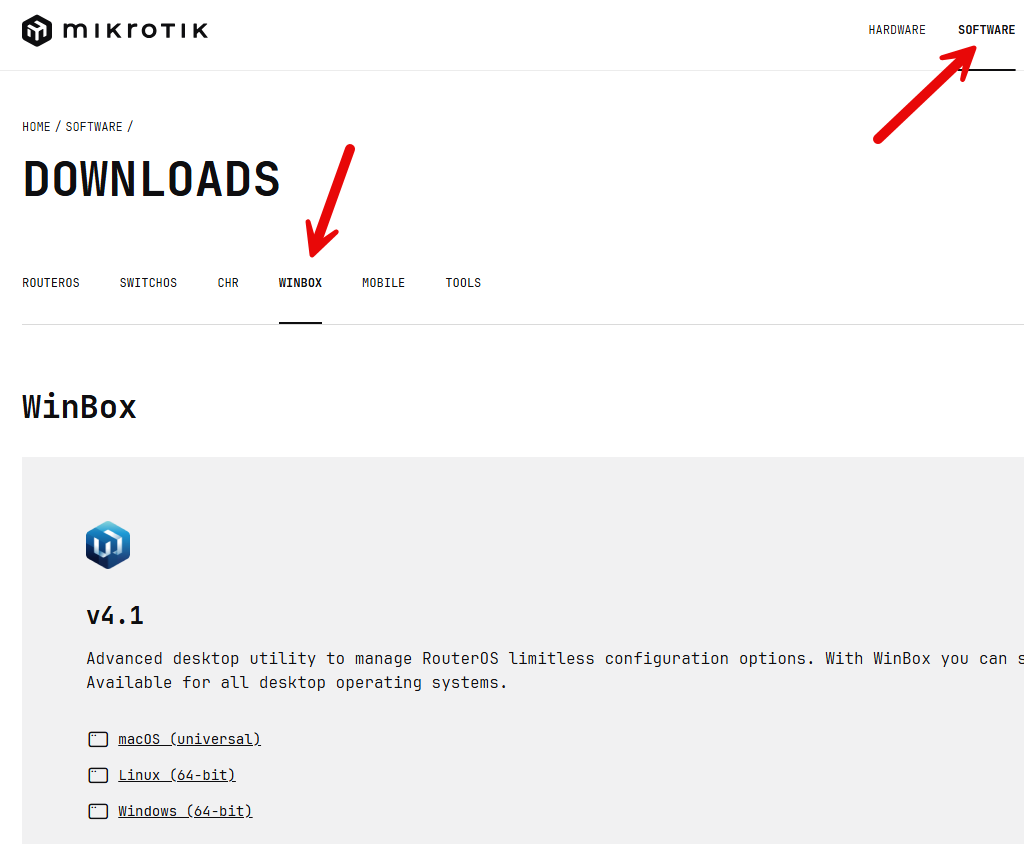
Start by visiting https://mikrotik.com/download/winbox and download Winbox for your operating system.
Once it is downloaded and installed, run it, and you should see the login screen.
Make sure you are connected to the router either via network cable or wirelessly.
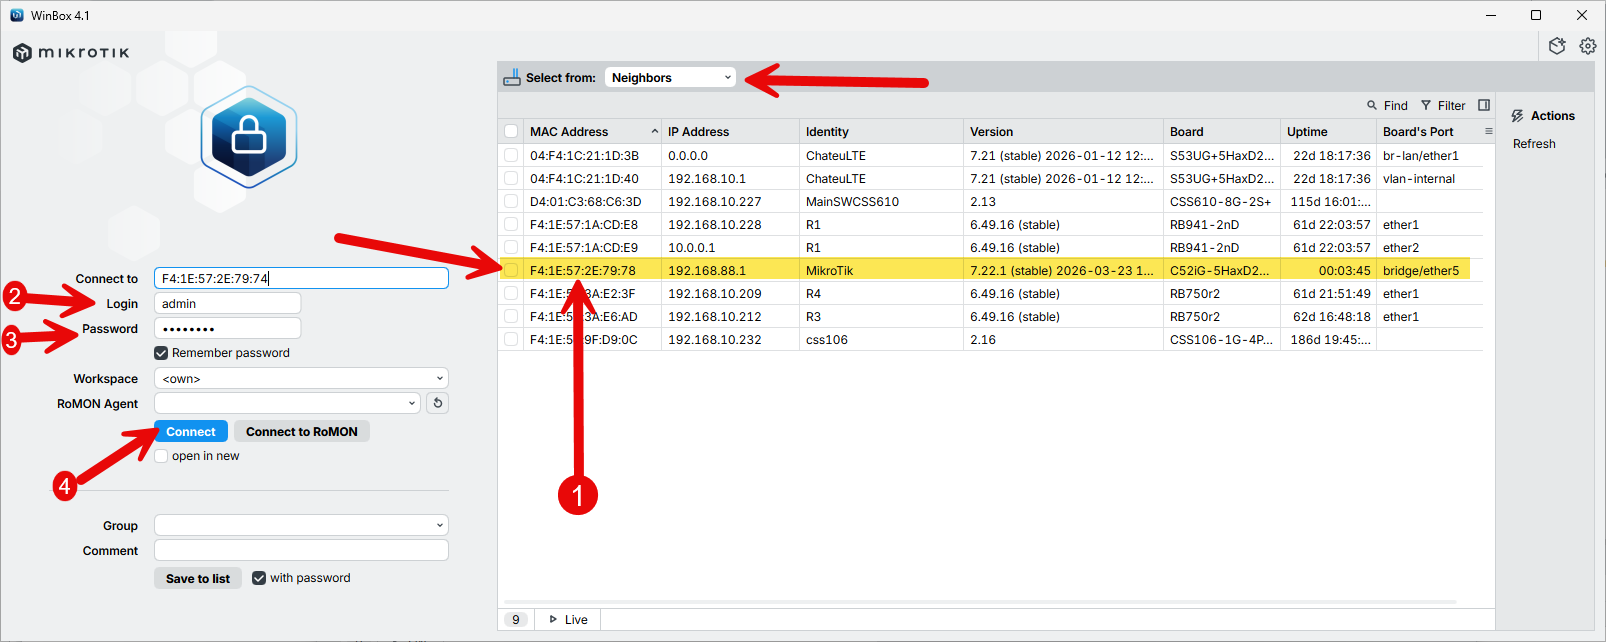
On the right-hand side, you can see all the devices that have been discovered; naturally, we have many more than you do. You should expect to see one line similar to the highlighted one.
You can connect either via MAC or IP address. For initial setup, we find connecting via MAC to be more reliable in WinBox. Click on the MAC address to copy it to the login form on the left-hand side. Enter the login details from the label, then click Connect.
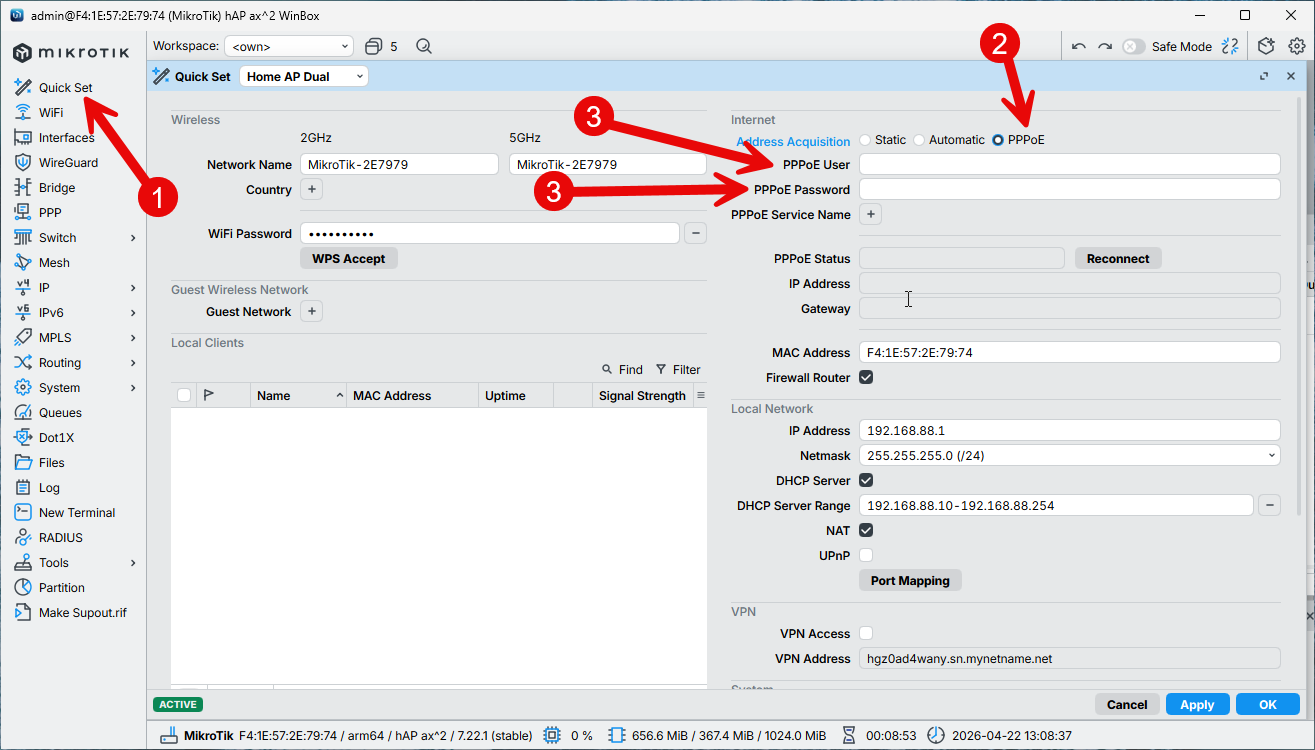
Click on the “Quick set” at the top of the left-hand menu, and you should see this screen
Start by selecting PPPoE at the top of the wizard’s right-hand side, then enter the login details you got from Hringdu right below that.
If you want to change the Wi-Fi name or password, you can do that on the left-hand side of the Wizard. You can also enable Guest network there if you want. Click OK when you’re done.
Unplug everything from the router Hringdu gave you and plug it into your new MikroTik hAP series router, making sure you use the MikroTik power supply that comes with the router.